• Spring naar de hoofdnavigatie
  • Door naar de hoofd inhoud
  • Spring naar de eerste sidebar
  • Spring naar de voettekst
GHENTlemen's BBQ
  • 🔥 BBQ & PIZZA TEAMBUILDINGS IN GENT
  • Algemeen
    • Over GHENTlemen’s BBQ
  • BBQ Recepten
    • Gangen
      • Drankjes
      • Hapjes / Tapas
      • Voorgerechten
      • Hoofdgerechten
      • Bijgerechten
      • Salades
      • Desserts
    • BBQ Klassiekers
    • Feestelijk Barbecuën
    • Low & Slow
    • Vegetarisch
    • Wild op de BBQ
  • Tips & Tricks
    • De BBQ Internetbibliotheek
    • De BBQ Bibliotheekkast
    • BBQ Restaurants
  • Contact
  • Navigation Menu: Social Icons

    • Facebook
    • Instagram
    • Pinterest
    • Twitter
Je bent hier: Home / Recepten / Hoofdgerechten / Kabeljauw in Papillot op de BBQ

Kabeljauw in Papillot op de BBQ

juni 18, 2015 By ghentlemensbbq

Naar recept gaan Recept afdrukken

kabeljauw in papillot

Wanneer je gasten over de vloer krijgt en je niet de volledige avond in de keuken wilt doorbrengen, is het verstandig een aantal simpele recepten achter de hand te hebben die je toelaten ook tijd met je gezelschap door te brengen. Daarom kan ik je deze kabeljauw in papillot op de BBQ van harte aanbevelen.

Bezorg jezelf geen stress met zorgen over “de cuisson” van het vlees of de gaarheid van de groenten. Maak het jezelf makkelijk en werk daarom met een minimum aan ingrediënten, stop deze in een papillot en voilà geen zorgen meer :)! Foolproof!

Met deze kabeljauw in papillot gaan alle groenten garen door het kookvocht, zijnde de wijn en de room. De stoom zal ervoor zorgen dat de vis en de groenten in een mum van tijd gaar zijn. Daarbij komt, omdat de papillot goed afgesloten is, dat de smaken enorm behouden blijven.

Enige nadeel, of liever gevaar, is dat je altijd goed moet opletten met een papillot om je niet te verbranden. Gebruik daarom liever 2 vellen aluminiumfolie op elkaar. Vroeger heb ik het ook al meegemaakt dat ik de papillot van de BBQ wou nemen en dat deze scheurde. Met de “vuile” gevolgen van dien. Om nog maar niet te spreken dat je kokende wijn of room over jou kan krijgen.

Dit kan je eventueel opvangen door de kabeljauw in papillot van Qbags te stoppen. Deze zakjes in aluminium hebben een klein venster zodat je kan zien wanneer je vis en groeten klaar zijn. Zo moet je niet meer gokken om een timing. Het extra leuke aan deze Qbags is dat je de venstertjes eruit kan nemen en dus zo uit de papillot kan eten.

Enige tijd geleden leerde ik deze kabeljauw in papillot op de BBQ eten bij goede vrienden van me. Door de simpliciteit en de lekkere smaken was ik enorm verkocht. In die mate zelfs dat ik het enkele weken later zelf al het gerecht klaarmaakte en ook meteen mijn bezoekers enthousiast kreeg.

Naast zalm of inkvis op de BBQ is vis voor mij steeds opnieuw een beetje een uitdaging. De schrik om de vis op een rooster te moeten draaien en dat deze dan zou breken, is mijn ergste nachtmerrie. Probeer dan nog maar eens je vis mooi te presenteren aan je gasten.

kabeljauw in papillot
Recept afdrukken

Kabeljauw in Papillot op de BBQ

Deze kabeljauw in papillot met wijn en fijne groeten is foolproof. Gewoon alle ingredienten in de papillot doen en 10 minuten wachten. Zo moet je nooit nog schrik hebben om een vis op de BBQ klaar te maken.
Voorbereidingstijd20 minuten min
Bereidingstijd10 minuten min
Totale tijd30 minuten min
Gang: Hoofdgerecht
Keuken: barbecue, BBQ
Trefwoord: kabeljauw, room, witte wijn
Servings: 2 personen

Equipment

  • BBQ
  • aluminiumfolie

Ingrediënten

  • 1 kabeljauwhaasje of 2 filets zonder vel
  • 1 dl witte wijn
  • 3-4 dl volle room
  • 1 wortel, julienne gesneden
  • 1 ui, julienne gesneden
  • handvol prei, julienne gesneden
  • 10 kleine trostomaatjes
  • peper en zout

Instructies

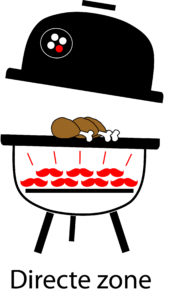
  • Maak de BBQ klaar om direct te grillen op Medium Hoge temperatuur 180 – 205°C
    Directe zone Grillen BBQ
  • Smeer met je vinger wat olie aan het oppervlak waar de vis komt te liggen.
  • Kruid de kabeljauw flink met peper en zout aan beide kanten en leg deze dan op het gedeelte met olie. Bedek de vis rijkelijk met de groenten.
    kabeljauw in papillot
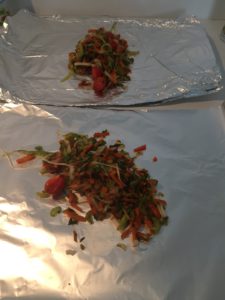
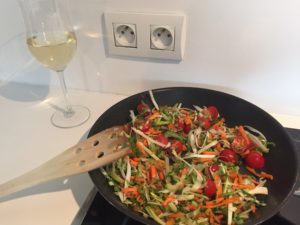
  • Eventueel kan je de groeten al op voorhand aanstoven voor extra smaak.
    kabeljauw in papillot
  • Overgiet met een scheutje witte wijn en overgiet het geheel daarna rijkelijk met room.
    kabeljauw in papillot
  • Vouw de papillot stevig dicht en plaats direct boven de kolen.
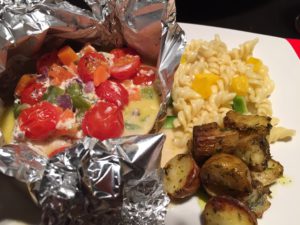
  • De vis is (afhankelijk van de dikte) na een 10-tal minuten klaar. Wees voorzichtig als je de papillot van de BBQ haalt, omdat de folie kan scheuren en je zo de hete room over jou kan krijgen!
  • Smakelijk!
    kabeljauw in papillot

Notities

  • Wil je je wat werk besparen,  dan kan je deze groenten vervangen door een voorverpakt zakje soepgroenten.
  • Je kan de groenten gerust op voorhand al aanstoven in de pan voor extra smaak.


Categorie: Hoofdgerechten Tags: Barbecue, barbecuer, barbeque, BBQ, bbq blog, bbq blogger, bbq gerechten, bbq hapje, bbq recepten, bbqer, blog, borrelhapje bbq, culinaire bbq, direct, directe zone, eenvoudige bbq recepten, eenvoudige en snelle gerechten, eenvoudige recepten, food blog, food blogger, foodie, ghentlemens, Ghentlemens BBQ, grill, grillen, houtskool, kabeljauw, kolen, makkelijk bbq, Michel Tiberghien, papillotte, passioneel, recept, recepten, room, snel en makkelijk bbq, snel klaar bbq, vis, vurig, witte wijn

Vorig bericht: « Nutella Pizza op de BBQ
Volgend bericht: Aardappelbom of Potato Bomb »

Primaire Sidebar

ghentlemens_bbq

🔥Passionate about Barbecue & Pizza
🔥Follow me for BBQ & Pizza inspiration
🔥DM for collabs, demos & workshops
🔥 Having BBQ & Pizza fun

🔥🥩🌶️ GRILLED KIMCHI & STEAK — THE PERFECT BBQ COMB 🔥🥩🌶️ GRILLED KIMCHI & STEAK — THE PERFECT BBQ COMBO 🌶️🥩🔥

Smoky steak. Charred kimchi. Bold flavors that were made for each other.

Grilling kimchi takes it to a whole new level. The heat caramelizes the sugars, softens the acidity and adds a subtle smoky flavor that pairs perfectly with a juicy steak.

🔥 Grilled Kimchi & Steak Recipe

You’ll need:

* 1 Ribeye, Bavette or Striploin steak
* 250g kimchiby @kimjang_be 
* 1 tbsp sesame oil
* 1 spring onion, sliced
* Sesame seeds
* Salt & black pepper

Method:

1️⃣ Preheat your BBQ for direct high heat (250°C+).

2️⃣ Season the steak generously with salt and pepper.

3️⃣ Grill the steak for 2-3 minutes per side, then finish indirect until your preferred doneness (52-54°C for medium-rare).

4️⃣ While the steak rests, place the kimchi in a cast iron pan or grill basket.

5️⃣ Toss with sesame oil and grill for 3-5 minutes, stirring occasionally until lightly charred.

6️⃣ Slice the steak against the grain and serve with the grilled kimchi.

7️⃣ Finish with spring onion and sesame seeds.

🔥 Rich beef.
🔥 Smoky spice.
🔥 Umami overload.

This might be one of the most underrated steak pairings you’ll ever try.

#SteakAndKimchi #KimchiBBQ #Ribeye #Bavette #LiveFireCooking BBQReels SteakLovers FireCooking GhentlemensBBQ Grill
🔥🥩 SLOW SMOKED SHORT RIBS — WHEN THE BONE SLIDES R 🔥🥩 SLOW SMOKED SHORT RIBS — WHEN THE BONE SLIDES RIGHT OUT 🥩🔥

This is how you know you’ve done it right.

Hours of low and slow smoke, steady heat, and plenty of patience. The result? Short ribs so tender that the bone pulls clean out with almost no effort.

Deep bark on the outside. Rich, juicy beef on the inside. Every bite packed with smoke, rendered fat and pure BBQ flavor.

No knives needed.
No tugging required.
Just pick up the bone and watch it slide free.

That’s the magic of low and slow BBQ. 🔥

Would you pull the bone first or take a bite first? 👇

#ShortRibs #SmokedBeef #LowAndSlow #BBQReels #LiveFireCooking BBQLife MeatLovers SmokeRing BBQAddict GhentlemensBBQ FireCooking BeefRibs
🔥🥧 MEAT PIES ON THE BBQ — COMFORT FOOD WITH FIRE 🥧 🔥🥧 MEAT PIES ON THE BBQ — COMFORT FOOD WITH FIRE 🥧🔥

Golden crust, smoky filling and bubbling gravy straight from the BBQ.
These meat pies are everything you want from comfort food — rich, crispy and packed with flavor.

Low heat underneath, a kiss of smoke from the fire, and a buttery crust that cracks open with every bite. Whether you fill them with slow-cooked beef, pulled pork or spicy minced meat… meat pies just hit different on the BBQ. 🔥

The best part?
You can prep them ahead, throw them on the grill, and let the BBQ do the work while everyone gathers around the fire.

Rustic. Smoky. Addictive.

#MeatPie #BBQComfortFood #LiveFireCooking #BBQRecipes #SmokedFood GhentlemensBBQ FireCooking BBQReels
publicity* That first smash says it all 🍔🔥  Hot gr publicity* That first smash says it all 🍔🔥 
Hot griddle on the Weber Genesis II, thin beef patties, and the Weber Burger Smasher creating that perfect crispy crust. 
And those caramelized onions? Absolute game changer 🤤 
Recipe (2 double smash burgers): 
🥩 400 g ground beef 
🧂 Salt & pepper 
🧅 2 large onions (thinly sliced) 
🍔 4 potato buns 
🥒 Pickles 
🥫 Burger sauce (mayo + ketchup + mustard + pickle relish) 
🧈 Butter 

Method: 
🔥 Preheat the griddle on your Weber Genesis II over high heat. 
1. Cook the onions low and slow in butter until soft and caramelized. Set aside. 
2. Divide the beef into 4 loose balls of 100g each. Don’t pack them too tightly. 
3. Place the beef balls on the hot griddle and smash them flat right away using the Weber Burger Smasher. 
4. Season with salt and pepper. Cook for 2 minutes until a crispy crust forms. 
5. Flip andcook for 1 more minute. 
6. Toast the buns on the griddle. 
7. Build your burger: sauce → patty → caramelized onions → pickles → second patty → top bun. 
Crispy edges and buttery onions… smash burgers done right 🔥🍔 
#smashburger #webergrill #webergenesis #weberbelux #burgerrecipe bbqlovers griddlecooking burgernight @weber_belux @primagaz_belgium
🔥🦑 GRILLED OCTOPUS TENTACLES — TENDER, CHARRED & F 🔥🦑 GRILLED OCTOPUS TENTACLES — TENDER, CHARRED & FULL OF FLAVOR 🦑🔥 

Crispy edges, smoky char and buttery tender octopus straight off the BBQ. It looks impressive, but it’s easier than you think. 

You’ll need: 
- 1 kg cooked octopus tentacles 
- 3 tbsp olive oil 
- 2 cloves garlic, minced 
- Juice of 1 lemon 
- 1 tsp smoked paprika 
- Salt & black pepper 
- Fresh parsley 
- Optional: chili flakes 

How to make it: 
1️⃣ If using raw octopus: simmer it first for 45–60 minutes until tender. Let it cool. 
2️⃣ Mix olive oil, garlic, lemon juice, paprika, salt and pepper. 
3️⃣ Coat the tentacles and let them marinate for 30 minutes. 
4️⃣ Heat your BBQ for direct high heat (250°C+). 
5️⃣ Grill the tentacles for 2–3 minutes per side until nicely charred and crispy on the edges. 
6️⃣ Finish with fresh parsley, extra lemon juice and chili flakes. 

Serve with grilled bread, chimichurri or a fresh salad. 

Simple ingredients. Big fire flavor. 🔥 

#GrilledOctopus #SeafoodBBQ #BBQRecipes #LiveFireCooking #OctopusTentacles GhentlemensBBQ FireCooking BBQ
🔥🥩 RIBEYE + BLAZING HOT KAMADO + GRILLGRATES = PUR 🔥🥩 RIBEYE + BLAZING HOT KAMADO + GRILLGRATES = PURE PERFECTION 🥩🔥 

This is how you build the ultimate crust. 
A thick ribeye hits screaming hot GrillGrates on a kamado and instantly starts sizzling. Those rails concentrate heat, create insane sear marks, and reduce flare-ups from dripping fat. 

Why GrillGrates? 👇 
🔥 Higher surface heat = faster sear 
🔥 Perfect grill marks every time 
🔥 Less direct flame = more control 
🔥 Juicy steak with an unreal crust 

Start by getting your kamado ripping hot (300°C+). 
Season your ribeye simply with salt and pepper. 
Sear for 2 minutes per side, rotate halfway for crosshatch marks, then move to indirect heat until your preferred internal temp. 

Rest. Slice. Enjoy. 

Because great steak doesn’t need much… just serious heat. 🔥 

#Ribeye #KamadoBBQ #GrillGrates #SteakLovers #BBQReels LiveFireCooking GrillMarks GhentlemensBBQ BBQTips
🔥🥩 TOMAHAWKS OVER OPEN FIRE — NEXT LEVEL BBQ 🥩🔥 T 🔥🥩 TOMAHAWKS OVER OPEN FIRE — NEXT LEVEL BBQ 🥩🔥

Throwback to the @bartbq.be  @momentsbymaya.be  event 🫶🏻🔥
Tomahawk steaks hanging above the flames, slowly roasting while the fire does all the work.
No rushing. No flipping every minute. Just heat, smoke and patience.

As the fat renders, it bastes the meat naturally. The flames add that deep smoky flavor and the hanging method creates an insane crust while keeping the inside perfectly juicy.

This is more than grilling — it’s an experience.
Big cuts. Open fire. Pure theatre. 🔥

Would you try this setup? 👀

#TomahawkSteak #OFYR #OpenFireCooking #LiveFireCooking #BBQReels SteakLovers FireCooking GhentlemensBBQ Tomahawk OutdoorCooking
Publiciteit 🔥🍕 PIZZA MARGHERITA ON A Weber GAS Bar Publiciteit 🔥🍕 PIZZA MARGHERITA ON A Weber GAS Barbecue — CRISPY, FAST & DELICIOUS 🍕🔥
No wood-fired oven? No problem. The Weber Genesis + pizza stone can make incredible pizza with crispy crust, bubbly cheese and that perfect golden bottom.

Pizza Margherita on a Gas Barbecue (Recipe)
You’ll need:
For the dough:
• 500 g pizza flour (00 flour)
• 325 ml warm water
• 10 g salt
• 3 g dry yeast

Toppings:
• 200 g of your finest tomato sauce
• Fresh mozzarella
• Fresh basil
• Olive oil
• Salt

How to make it:
1️⃣ Make the dough: Mix flour, water, yeast and salt. Knead until smooth and let rise for 1–2 hours. Divide into dough balls and let them rest for another 30 minutes.
2️⃣ Preheat the barbecue: Place your pizza stone on the grill and preheat your gas barbecue to 300–350°C with the lid closed for at least 20–30 minutes.
3️⃣ Stretch the dough: Stretch into a thin round base.
4️⃣ Top lightly: Add tomato sauce, mozzarella and a drizzle of olive oil. Don’t overload it.
5️⃣ Bake: Slide onto the hot pizza stone and bake for 4–6 minutes, rotating if needed.
6️⃣ Finish: Add fresh basil after baking and serve immediately.
🔥 Crispy base, melted cheese and perfect summer pizza nights at home.
 
#weberbelux ux #WeberGenesis #PizzaMargherita #GasBBQPizza #PizzaStone HomemadePizza BBQReels GhentlemensBBQ PizzaLovers @weber_belux
🔥🥔 CRISPY BABY POTATOES OVER OPEN FIRE 🥔🔥 Simple i 🔥🥔 CRISPY BABY POTATOES OVER OPEN FIRE 🥔🔥
Simple ingredients, big flavor. Baby potatoes sizzling over open fire with butter, fresh herbs and crispy golden edges — the ultimate BBQ side dish.

Open Fire Baby Potatoes (Recipe)

You’ll need:

* 1 kg baby potatoes
* 3 tbsp olive oil or melted butter
* 3 cloves garlic, minced
* Fresh rosemary & thyme
* Salt & black pepper
* Optional: grated parmesan or chili flakes

How to make it:
1️⃣ Parboil the baby potatoes for 10–12 minutes until just tender. Drain well.
2️⃣ Heat a hot plate or skillet over open fire.
3️⃣ Toss the potatoes with oil, garlic, herbs, salt and pepper.
4️⃣ Grill them over the fire for 15–20 minutes, turning regularly until crispy and golden.
5️⃣ Finish with extra fresh herbs, parmesan or chili flakes.

🔥 Crispy outside, soft inside — proof that simple BBQ sides can steal the show.

#OpenFireCooking #BabyPotatoes #BBQSides #LiveFireCooking #FireFood GhentlemensBBQ BBQReels OutdoorCooking
Volgen op Instagram

Populaire BBQ recepten

Gegrilde tomaten, grill daarna de bolle zijde voor zo'n 3-5 minuten
st louis pork steak in bbq saus
kerrie kip op pellet bbq
steak met koffie rub
champignon gevuld met boursin en spek
de smash burger

Footer

Volg ons:

  • Facebook
  • Instagram
  • Pinterest
  • Twitter

Copyright © 2026 · GHENTlemen's BBQ · Log in