• Spring naar de hoofdnavigatie
  • Door naar de hoofd inhoud
  • Spring naar de eerste sidebar
  • Spring naar de voettekst
GHENTlemen's BBQ
  • Algemeen
    • Over GHENTlemen’s BBQ
  • Workshops
  • BBQ Recepten
    • Gangen
      • Drankjes
      • Hapjes / Tapas
      • Voorgerechten
      • Hoofdgerechten
      • Bijgerechten
      • Salades
      • Desserts
    • BBQ Klassiekers
    • Feestelijk Barbecuën
    • Low & Slow
    • Vegetarisch
    • Wild op de BBQ
  • Tips & Tricks
    • De BBQ Internetbibliotheek
    • De BBQ Bibliotheekkast
    • BBQ Restaurants
  • Contact
  • Navigation Menu: Social Icons

    • Facebook
    • Instagram
    • Pinterest
    • Twitter
Je bent hier: Home / Recepten / Bijgerechten / Mangochutney

Mangochutney

augustus 16, 2018 By ghentlemensbbq

Deze zoete smaakmaker kan je zowel in de winter als in de zomer bereiden. Tevens heb je er eigenlijk niet zoveel werk aan. Alleen heb je wel wat ingrediënten nodig.
Deze heerlijke zoete smaak kan je zeker nog opwerken met extra pikante chilipeper(s) als je het graag wat pittiger hebt.
Benodigdheden voor 4 personen:

  • 1/2 rode ui, fijn gehakt
  • 3 el citroensap
  • 4 el sinaasappelsap
  • 4 el rode wijnazijn
  • 1/2 tl garam masala
  • 1/2 tl kerriepoeder
  • 250 gr mangostukjes
  • 1 el honing
  • 2 el bruine suiker
  • 2 tl verse geraspte gember
  • 1/2 chilipeper, zaadjes verwijderd en fijn gehakt
  • 1 teentje knoflook, geraspt
  • 1 el olie
  • peper en zout

Setup van de BBQ:Directe zone Grillen BBQ

  • Maak de barbecue klaar om direct te grillen op medium temperatuur van 180 – 200°C. Of maak dit klaar op het fornuis :).

Bereidingswijze:

  1. Meng het citroensap met de wijnazijn, kerriepoeder en garam masala.
  2. Verhit de olie en fruit hierin de rode ui. Voeg de chili peper, gember en knoflook toe en bak deze even kort mee.
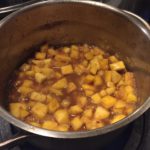
  3. Roer de stukjes mango erdoor. Giet de citroen met azijn erbij en voeg de bruine suiker en honing toe. Breng dit aan de kook en laat het op zacht vuur 15 minuten pruttelen.
  4. Na 15 minuten zal de gele kleur plaats gemaakt hebben voor een bruine kleur. Voeg nu het sinaasappelsap toe. Laat dit in ca. 30 tot 35 minuten op zacht vuur pruttelen.
  5. Als de chutney te droog wordt tijdens het koken voeg je kleine scheutjes water toe. Breng de chutney op smaak met peper en zout.
  6. Serveer warm, lauw of koud.
  7. Smakelijk.

mango chutney


Categorie: Bijgerechten Tags: Barbecue, barbecuer, barbeque, BBQ, bbq blog, bbq blogger, bbq gerechten, bbq hapje, bbq recepten, bbqer, blog, borrelhapje bbq, bruine suiker, chilipeper, citroensap, culinaire bbq, directe zone, eenvoudige bbq recepten, eenvoudige en snelle gerechten, eenvoudige recepten, food blog, food blogger, foodie, garam masala, gember, ghentlemens, Ghentlemens BBQ, grill, grillen, houtskool, kerriepoeder, knoflook, kolen, makkelijk bbq, mango, mango chutney, mangochutney, Michel Tiberghien, passioneel, recept, recepten, rode wijnazijn, sinaasappelsap, snel en makkelijk bbq, snel klaar bbq, ui, vurig

Vorig bericht: « Mosselen met Venkel en Pastis op de Yakiniku
Volgend bericht: Monsieur Boudin Sunee met Mangochutney en Avocado op de Yakiniku »

Lees Interacties

Trackbacks

  1. Monsieur Boudin Sunee met Mangochutney en Avocado op de Yakiniku – GHENTlemen's BBQ schreef:
    augustus 17, 2018 om 11:55

    […] mangochutney […]

Primaire Sidebar

ghentlemens_bbq

🔥 Here’s a quick how-to: Season the picanha w 🔥 Here’s a quick how-to: Season the picanha with rock salt, let it marinate, then skewer it fat side up. Grill over high heat until crispy on the outside, medium-rare inside. Slice against the grain for that melt-in-your-mouth perfection. 🍽️✨ 

#ChurrascoMastery #GrillingGoals #picanha #steak #picanhas #churrasco #churrascaria #churrascada #picanhanabrasa #picanhagrill #bbqblogger #belgianbbq
🔥 Steak with a crust 🔥 Rate this sound of th 🔥 Steak with a crust 🔥
Rate this sound of the crust on this steak. Is’t this the best sound you can get from a steak?
Get this result with the reverse sear method. Heat the steak and at the last moment sear in over a blasting hot grill

#Steaks #Meatlover #Steakdinner #Steak #Grilling #Bbqlife #Steaklover #Meatporn #Mediumrare #Steaknight #Beef #Steakporn #Ribeyesteak #Barbecue #Tomahawksteak #Tbonesteak #Bbq #Meat #Steaklovers #Grill #Bbqporn
🔥 full plate 🔥 Lokken for side dishes? Easy, 🔥 full plate 🔥
Lokken for side dishes? Easy, all veggies are possible. Challenge yourself and try veggie recipes. I know myself veggies and sides are not my forte, but it’s great to try out things and challenge myself…

What are you favourite veggies and sides?

#bbq #vegetables #foodlove #charcoal #foodinspiration #bbqlovers #bbqporn #veggielover #grilledveggies #grillsaison #bbqveggies #bbqinspiration #bbqmaster #piaster #bbqblogger #belgianbbq
🔥 Pastrami for Lunch? 🔥 What’s for lunch? 🔥 Pastrami for Lunch? 🔥
What’s for lunch?

#bbq #meat #grilling #meatlover #bbqlife #pastrami #meatsweats #bbqsmoker #bbqfamily #bbqgrill #bbqmaster #bbqaddiction #bbqnight #meatfeast #bbqing #pastramisandwich #bbqdinner #pastramilovers #pastramionrye #pastramiburger #hotpastrami
🔥 Tomapork 🔥 Hot searing is the perfect way 🔥 Tomapork 🔥
Hot searing is the perfect way to create a nice crunchy crust on meat. Excellent for pork meat.
🔥Morning rituals: 🔥 Woke up and realized I h 🔥Morning rituals: 🔥
Woke up and realized I had two true loves – coffee and chicken wings on the BBQ. Because who needs a balanced breakfast when you can have a caffeinated chicken fiesta at sunrise? ☕🍗 Embracing the chaos, one cup of coffee and one wing at a time. 

#MorningMadness #WingedAwakening #wings #bbqwings #coffee #bbq #breakfastbbq #chickenwings #grilledwinfs #buffalowings #breakfastcoffee #belgianbbq #bbqblogger
🍕 Step up your pizza game with a Woodfired Oven 🍕 Step up your pizza game with a Woodfired Oven! 🔥 Follow these concrete steps for a perfect homemade pizza:

1. **Prepare the Dough:**
 Start with a classic pizza dough recipe. Mix flour, water, yeast, salt, and a pinch of sugar. Let it rise until doubled in size.

2. **Build the Woodfired Oven:**
 Construct a woodfired oven using bricks and concrete. Ensure proper insulation for even heat distribution. Let it cure according to concrete specifications.

3. **Ignite the Fire:**
 Build a fire inside the oven using hardwood logs. Let it burn until the interior reaches the desired cooking temperature (usually around 700°F/370°C).

4. **Roll out the Dough:**
 Roll your pizza dough into the desired thickness. A thinner crust is ideal for woodfired ovens.

5. **Top it Up:**
 Add your favorite sauce, cheese, and toppings. Keep it simple for the woodfired flavor to shine through.

6. **Use a Peel:**
 Place your pizza on a pizza peel dusted with flour or cornmeal for easy transfer into the hot oven.

7. **Into the Oven:**
 Slide the pizza onto the hot oven floor. Rotate it occasionally for an even cook, usually 2-5 minutes.

8. **Watch and Enjoy:**
 Keep a close eye on your pizza. Once the crust is golden and the cheese is bubbly, your woodfired masterpiece is ready!

9. **Serve Hot:**
 Take it out, let it cool for a moment, slice, and enjoy the incredible flavor of a woodfired pizza!

#WoodfiredPizza #HomemadePizza #PizzaLovers #WoodfiredOven #PizzaTime 🚀
Embracing the festive vibes with a twist! 🎄🥧 Embracing the festive vibes with a twist! 🎄🥧 Grilled minced pie topped with a Christmas tree cookie—because holiday treats are better with a BBQ touch! 🔥✨ Prepared at the @pitt.outdoor PITT master workshop. 

#ChristmasFlavors #BBQTreats #FestiveDelights #mincedpie #bbqlincedpie #bbqmenu #xmassbbq #bbq #bbqfun #bbqfamily #bbqnation @bbqpitmaster #bbqbelgium #pitmaster #bbqpitmaster #belgianbbq #bbqblogger
🍗✨ Grilling Magic: Rotisserie Chicken on Gas 🍗✨ Grilling Magic: Rotisserie Chicken on Gas BBQ! ✨🔥

Step 1️⃣: Prep the bird 🐔
Start with a fresh chicken. Pat it dry with paper towels, then generously season with salt, pepper, and your favorite herbs. Let it marinate for at least 30 minutes.

Step 2️⃣: Secure the chicken 🔄
Skewer the chicken onto the rotisserie rod, ensuring it’s balanced for even cooking. Use prongs to secure the wings and legs, keeping everything snug.

Step 3️⃣: Fire up the BBQ 🔥
Preheat your gas BBQ on medium-high heat. Aim for a consistent temperature around 350°F (175°C). Place a drip pan underneath to catch those flavorful drippings.

Step 4️⃣: Set the rotisserie in motion 🔄
Turn on the rotisserie motor and let the magic begin! Close the lid to lock in heat and moisture. This slow rotation ensures a juicy, evenly cooked chicken.

Step 5️⃣: Baste for flavor 💦
Every 20 minutes, brush the chicken with a tasty basting sauce. Mix olive oil, garlic, lemon juice, and your favorite herbs for an irresistible flavor boost.

Step 6️⃣: Check the temp 🌡️
After about 1.5-2 hours, use a meat thermometer to check the internal temperature. Aim for 165°F (74°C) in the thickest part of the meat. Adjust cooking time if needed.

Step 7️⃣: Rest and carve 🍽️
Let the chicken rest for 10 minutes before carving. This allows juices to redistribute, keeping the meat moist. Slice, serve, and watch those smiles appear! 😋🍴

Step 8️⃣: Share your masterpiece! 📸
Snap a pic of your perfectly grilled rotisserie chicken and share the deliciousness with friends. Tag #BBQMasterChef for a chance to be featured! 📷🔥

Happy grilling! 🎉 #GrillAndChill #RotisserieChickenLove #RotisserieChicken #BBQDelights #GrillMaster #BBQLife #ChickenOnTheRotisseri #FlavorfulGrilling #BBQMagic #GrillAndChill #JuicyChicken #BBQSeason #RotisserieLove #SmokedChicken #BBQGoals #GrillTime #foodieadventure
Meer laden… Volgen op Instagram

Populaire BBQ recepten

Potatobomb klaar om te serveren
jack daniels Fire Ball Meatballs injecteren met whisky
kreeft op de bbq
avocado met ei 7

Footer

Volg ons:

  • Facebook
  • Instagram
  • Pinterest
  • Twitter

Copyright © 2023 · GHENTlemen's BBQ · Log in