• Spring naar de hoofdnavigatie
  • Door naar de hoofd inhoud
  • Spring naar de eerste sidebar
  • Spring naar de voettekst
GHENTlemen's BBQ
  • 🔥 BBQ & PIZZA TEAMBUILDINGS IN GENT
  • Algemeen
    • Over GHENTlemen’s BBQ
  • BBQ Recepten
    • Gangen
      • Drankjes
      • Hapjes / Tapas
      • Voorgerechten
      • Hoofdgerechten
      • Bijgerechten
      • Salades
      • Desserts
    • BBQ Klassiekers
    • Feestelijk Barbecuën
    • Low & Slow
    • Vegetarisch
    • Wild op de BBQ
  • Tips & Tricks
    • De BBQ Internetbibliotheek
    • De BBQ Bibliotheekkast
    • BBQ Restaurants
  • Contact
  • Navigation Menu: Social Icons

    • Facebook
    • Instagram
    • Pinterest
    • Twitter
Je bent hier: Home / Tips & Tricks / Een BBQ aanmaken… in 25 minuten

Een BBQ aanmaken… in 25 minuten

augustus 4, 2014 By ghentlemensbbq

Ooit was er een tijd dat ik wist wanneer ik aan een BBQ begon maar niet wanneer de kolen klaar zouden zijn om te beginnen bakken. Wel die tijd is gedaan, met een brikettenstarter of firestarter klaar je deze klus in 25 minuten!
Nooit meer aanmaakblokjes tussen hoopjes kolen proppen, nooit meer een haardroger gebruiken om het vuur aan te wakkeren… en zeker nooit meer aanmaakvloeistof gebruiken!!!
Vanaf nu: Firestarter vullen met kolen, 2 aanmaakblokjes in brand steken en kolenstarter erboven zetten… klaar in 25 minuten… Of maar 25 minuten om een apero te nemen 😉
Werkwijze:

  1. Vul de Firestarter tot 3/4 met briketten, afhankelijk van de hoeveelheid die je die dag zal nodig hebben
  2. Plaats 2 aanmaakblokjes op het onderste rooster van je BBQ en steek deze in brand
  3. Plaats de Firestarter met kolen er bovenop
  4. Wacht 25 minuten of tot er een grijze aslaag op de kolen ligt
  5. Giet de kolen uit op de vuurrooster
  6. Plaats je rooster op de BBQ
  7. KLAAR!

 
Tips:

  • Je kan de aanmaakblokjes vervangen door krantenpapier dat je oprolt en in het onderste gedeelte van de Firestarter stopt. Nu, enkele studies tonen aan dat het verbranden van die inkt giftig zou zijn. Speel dus op veilig en gebruik aanmaakblokjes.
  • Er bestaan ook Firestarters van verschillende groottes en merken met prijzen die variëren van €15 tot €25
  • Gebruik handschoenen om de Firestarter te hanteren, deze zal gloeiendheet zijn!
  • Gebruik nooit aanmaakvloeistof, deze is niet alleen zéér gevaarlijk maar geeft ook een geur en smaak af op je eten! (en niet de geur en smaak van het aangename type).
  • Bij het uitgieten van de kolen ga je best met je rug naar de wind staan voor de veiligheid.
  • Past de brikettenstarter niet in de BBQ, dan kan je deze op 2 bakstenen zetten om de ondergrond te beschermen.


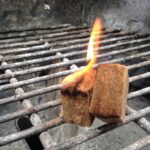
Steek twee aanmaakblokjes in brand
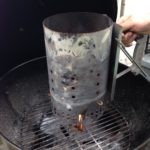
Plaats de starter bovenop de aanmaakblokjes
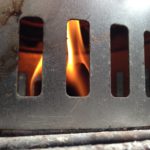
Er zijn genoeg luchtgaten voorzien om het vuur aan te wakkeren

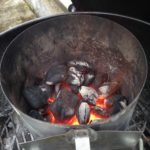
Na 20 minuten zijn de kolen bijna klaar
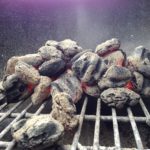
De kolen zijn pas klaar als er een aslaagje op verschijnt.

Categorie: Tips & Tricks Tags: aanmaakblokje, Barbecue, barbecuer, barbeque, BBQ, bbq blog, bbq blogger, bbq gerechten, bbq hapje, bbq recepten, bbqer, blog, borrelhapje bbq, briketten, brikettenstarter, culinaire bbq, directe zone, eenvoudige bbq recepten, eenvoudige en snelle gerechten, eenvoudige recepten, firestarter, food blog, food blogger, foodie, ghentlemens, Ghentlemens BBQ, grill, grillen, handschoenen, houtskool, kolen, makkelijk bbq, Michel Tiberghien, passioneel, recept, recepten, snel en makkelijk bbq, snel klaar bbq, vurig

Vorig bericht: « Mini-Pizza op de BBQ
Volgend bericht: BeerCan Chicken of Drunken Chicken »

Primaire Sidebar

ghentlemens_bbq

🔥Passionate about Barbecue & Pizza
🔥Follow me for BBQ & Pizza inspiration
🔥DM for collabs, demos & workshops
🔥 Having BBQ & Pizza fun

🔥🦪 WHITE WINE MUSSELS ON THE HOT PLATE 🦪🔥 Who say 🔥🦪 WHITE WINE MUSSELS ON THE HOT PLATE 🦪🔥

Who says mussels need a pot? Throw them straight onto the hot plate and let the fire work its magic.

The juices from the mussels mix with butter, garlic and white wine right on the cooking surface, creating an incredible smoky sauce packed with flavor.

🔥 White Wine Mussels on the Hot Plate

You’ll need:

* 2 kg fresh mussels
* 50 g butter
* 2 shallots, finely diced
* 3 cloves garlic, minced
* 250 ml dry white wine
* Fresh parsley, chopped
* Juice of ½ lemon
* Freshly cracked black pepper

Method:

1️⃣ Heat the cooking plate until it’s nice and hot.

2️⃣ Melt the butter directly on the plate and sauté the shallots and garlic until fragrant.

3️⃣ Add the mussels directly onto the plate and spread them out.

4️⃣ Pour the white wine over the mussels and let it sizzle.

5️⃣ Using spatulas, toss the mussels regularly for 5–8 minutes until they open.

6️⃣ Finish with fresh parsley, lemon juice and black pepper.

7️⃣ Serve immediately with grilled bread to mop up all those delicious juices.

🔥 No pot.
🔥 No lid.
🔥 Just fire, wine and perfectly cooked mussels.

#Mussels #WhiteWineMussels #OFYRCooking #OpenFireCooking #SeafoodBBQ LiveFireCooking BBQReels GhentlemensBBQ FireFood
🔥🥩🌶️ GRILLED KIMCHI & STEAK — THE PERFECT BBQ COMB 🔥🥩🌶️ GRILLED KIMCHI & STEAK — THE PERFECT BBQ COMBO 🌶️🥩🔥

Smoky steak. Charred kimchi. Bold flavors that were made for each other.

Grilling kimchi takes it to a whole new level. The heat caramelizes the sugars, softens the acidity and adds a subtle smoky flavor that pairs perfectly with a juicy steak.

🔥 Grilled Kimchi & Steak Recipe

You’ll need:

* 1 Ribeye, Bavette or Striploin steak
* 250g kimchiby @kimjang_be 
* 1 tbsp sesame oil
* 1 spring onion, sliced
* Sesame seeds
* Salt & black pepper

Method:

1️⃣ Preheat your BBQ for direct high heat (250°C+).

2️⃣ Season the steak generously with salt and pepper.

3️⃣ Grill the steak for 2-3 minutes per side, then finish indirect until your preferred doneness (52-54°C for medium-rare).

4️⃣ While the steak rests, place the kimchi in a cast iron pan or grill basket.

5️⃣ Toss with sesame oil and grill for 3-5 minutes, stirring occasionally until lightly charred.

6️⃣ Slice the steak against the grain and serve with the grilled kimchi.

7️⃣ Finish with spring onion and sesame seeds.

🔥 Rich beef.
🔥 Smoky spice.
🔥 Umami overload.

This might be one of the most underrated steak pairings you’ll ever try.

#SteakAndKimchi #KimchiBBQ #Ribeye #Bavette #LiveFireCooking BBQReels SteakLovers FireCooking GhentlemensBBQ Grill
🔥🥩 SLOW SMOKED SHORT RIBS — WHEN THE BONE SLIDES R 🔥🥩 SLOW SMOKED SHORT RIBS — WHEN THE BONE SLIDES RIGHT OUT 🥩🔥

This is how you know you’ve done it right.

Hours of low and slow smoke, steady heat, and plenty of patience. The result? Short ribs so tender that the bone pulls clean out with almost no effort.

Deep bark on the outside. Rich, juicy beef on the inside. Every bite packed with smoke, rendered fat and pure BBQ flavor.

No knives needed.
No tugging required.
Just pick up the bone and watch it slide free.

That’s the magic of low and slow BBQ. 🔥

Would you pull the bone first or take a bite first? 👇

#ShortRibs #SmokedBeef #LowAndSlow #BBQReels #LiveFireCooking BBQLife MeatLovers SmokeRing BBQAddict GhentlemensBBQ FireCooking BeefRibs
🔥🥧 MEAT PIES ON THE BBQ — COMFORT FOOD WITH FIRE 🥧 🔥🥧 MEAT PIES ON THE BBQ — COMFORT FOOD WITH FIRE 🥧🔥

Golden crust, smoky filling and bubbling gravy straight from the BBQ.
These meat pies are everything you want from comfort food — rich, crispy and packed with flavor.

Low heat underneath, a kiss of smoke from the fire, and a buttery crust that cracks open with every bite. Whether you fill them with slow-cooked beef, pulled pork or spicy minced meat… meat pies just hit different on the BBQ. 🔥

The best part?
You can prep them ahead, throw them on the grill, and let the BBQ do the work while everyone gathers around the fire.

Rustic. Smoky. Addictive.

#MeatPie #BBQComfortFood #LiveFireCooking #BBQRecipes #SmokedFood GhentlemensBBQ FireCooking BBQReels
publicity* That first smash says it all 🍔🔥  Hot gr publicity* That first smash says it all 🍔🔥 
Hot griddle on the Weber Genesis II, thin beef patties, and the Weber Burger Smasher creating that perfect crispy crust. 
And those caramelized onions? Absolute game changer 🤤 
Recipe (2 double smash burgers): 
🥩 400 g ground beef 
🧂 Salt & pepper 
🧅 2 large onions (thinly sliced) 
🍔 4 potato buns 
🥒 Pickles 
🥫 Burger sauce (mayo + ketchup + mustard + pickle relish) 
🧈 Butter 

Method: 
🔥 Preheat the griddle on your Weber Genesis II over high heat. 
1. Cook the onions low and slow in butter until soft and caramelized. Set aside. 
2. Divide the beef into 4 loose balls of 100g each. Don’t pack them too tightly. 
3. Place the beef balls on the hot griddle and smash them flat right away using the Weber Burger Smasher. 
4. Season with salt and pepper. Cook for 2 minutes until a crispy crust forms. 
5. Flip andcook for 1 more minute. 
6. Toast the buns on the griddle. 
7. Build your burger: sauce → patty → caramelized onions → pickles → second patty → top bun. 
Crispy edges and buttery onions… smash burgers done right 🔥🍔 
#smashburger #webergrill #webergenesis #weberbelux #burgerrecipe bbqlovers griddlecooking burgernight @weber_belux @primagaz_belgium
🔥🦑 GRILLED OCTOPUS TENTACLES — TENDER, CHARRED & F 🔥🦑 GRILLED OCTOPUS TENTACLES — TENDER, CHARRED & FULL OF FLAVOR 🦑🔥 

Crispy edges, smoky char and buttery tender octopus straight off the BBQ. It looks impressive, but it’s easier than you think. 

You’ll need: 
- 1 kg cooked octopus tentacles 
- 3 tbsp olive oil 
- 2 cloves garlic, minced 
- Juice of 1 lemon 
- 1 tsp smoked paprika 
- Salt & black pepper 
- Fresh parsley 
- Optional: chili flakes 

How to make it: 
1️⃣ If using raw octopus: simmer it first for 45–60 minutes until tender. Let it cool. 
2️⃣ Mix olive oil, garlic, lemon juice, paprika, salt and pepper. 
3️⃣ Coat the tentacles and let them marinate for 30 minutes. 
4️⃣ Heat your BBQ for direct high heat (250°C+). 
5️⃣ Grill the tentacles for 2–3 minutes per side until nicely charred and crispy on the edges. 
6️⃣ Finish with fresh parsley, extra lemon juice and chili flakes. 

Serve with grilled bread, chimichurri or a fresh salad. 

Simple ingredients. Big fire flavor. 🔥 

#GrilledOctopus #SeafoodBBQ #BBQRecipes #LiveFireCooking #OctopusTentacles GhentlemensBBQ FireCooking BBQ
🔥🥩 RIBEYE + BLAZING HOT KAMADO + GRILLGRATES = PUR 🔥🥩 RIBEYE + BLAZING HOT KAMADO + GRILLGRATES = PURE PERFECTION 🥩🔥 

This is how you build the ultimate crust. 
A thick ribeye hits screaming hot GrillGrates on a kamado and instantly starts sizzling. Those rails concentrate heat, create insane sear marks, and reduce flare-ups from dripping fat. 

Why GrillGrates? 👇 
🔥 Higher surface heat = faster sear 
🔥 Perfect grill marks every time 
🔥 Less direct flame = more control 
🔥 Juicy steak with an unreal crust 

Start by getting your kamado ripping hot (300°C+). 
Season your ribeye simply with salt and pepper. 
Sear for 2 minutes per side, rotate halfway for crosshatch marks, then move to indirect heat until your preferred internal temp. 

Rest. Slice. Enjoy. 

Because great steak doesn’t need much… just serious heat. 🔥 

#Ribeye #KamadoBBQ #GrillGrates #SteakLovers #BBQReels LiveFireCooking GrillMarks GhentlemensBBQ BBQTips
🔥🥩 TOMAHAWKS OVER OPEN FIRE — NEXT LEVEL BBQ 🥩🔥 T 🔥🥩 TOMAHAWKS OVER OPEN FIRE — NEXT LEVEL BBQ 🥩🔥

Throwback to the @bartbq.be  @momentsbymaya.be  event 🫶🏻🔥
Tomahawk steaks hanging above the flames, slowly roasting while the fire does all the work.
No rushing. No flipping every minute. Just heat, smoke and patience.

As the fat renders, it bastes the meat naturally. The flames add that deep smoky flavor and the hanging method creates an insane crust while keeping the inside perfectly juicy.

This is more than grilling — it’s an experience.
Big cuts. Open fire. Pure theatre. 🔥

Would you try this setup? 👀

#TomahawkSteak #OFYR #OpenFireCooking #LiveFireCooking #BBQReels SteakLovers FireCooking GhentlemensBBQ Tomahawk OutdoorCooking
Publiciteit 🔥🍕 PIZZA MARGHERITA ON A Weber GAS Bar Publiciteit 🔥🍕 PIZZA MARGHERITA ON A Weber GAS Barbecue — CRISPY, FAST & DELICIOUS 🍕🔥
No wood-fired oven? No problem. The Weber Genesis + pizza stone can make incredible pizza with crispy crust, bubbly cheese and that perfect golden bottom.

Pizza Margherita on a Gas Barbecue (Recipe)
You’ll need:
For the dough:
• 500 g pizza flour (00 flour)
• 325 ml warm water
• 10 g salt
• 3 g dry yeast

Toppings:
• 200 g of your finest tomato sauce
• Fresh mozzarella
• Fresh basil
• Olive oil
• Salt

How to make it:
1️⃣ Make the dough: Mix flour, water, yeast and salt. Knead until smooth and let rise for 1–2 hours. Divide into dough balls and let them rest for another 30 minutes.
2️⃣ Preheat the barbecue: Place your pizza stone on the grill and preheat your gas barbecue to 300–350°C with the lid closed for at least 20–30 minutes.
3️⃣ Stretch the dough: Stretch into a thin round base.
4️⃣ Top lightly: Add tomato sauce, mozzarella and a drizzle of olive oil. Don’t overload it.
5️⃣ Bake: Slide onto the hot pizza stone and bake for 4–6 minutes, rotating if needed.
6️⃣ Finish: Add fresh basil after baking and serve immediately.
🔥 Crispy base, melted cheese and perfect summer pizza nights at home.
 
#weberbelux ux #WeberGenesis #PizzaMargherita #GasBBQPizza #PizzaStone HomemadePizza BBQReels GhentlemensBBQ PizzaLovers @weber_belux
Volgen op Instagram

Populaire BBQ recepten

smores 3
chicken bomb gevuld met kaas, jalapeno peper en omwikkeld met spek en daarna ingewreven met bbq saus
aardappelspiesje met spek
Pull Apart Bread, verwijder de folie om verder te bakken

Footer

Volg ons:

  • Facebook
  • Instagram
  • Pinterest
  • Twitter

Copyright © 2026 · GHENTlemen's BBQ · Log in